If you write JavaScript code, then you most probably know ESLint. If not, you really should. ESLint is the current linting tool for JavaScript.
A Pluggable JavaScript Linter
The Getting Started page describes ESLint like so:
ESLint is a tool for identifying and reporting on patterns found in ECMAScript/JavaScript code, with the goal of making code more consistent and avoiding bugs.
In other words, ESLint analyzes JavaScript code and compares it with a set of predefined, configurable rules. These rules may target, for example, the code quality, or enforce a specific style guide. In the end, running ESLint on your codebase will provide you with a statement about the overall quality and consistency of the code.
The following sections provide straightforward instructions for both installation and usage of ESLint—even for WordPress projects.
Installing ESLint
The installation of ESLint is quite easy, and yet comes with a few preconditions. ESLint can be installed via npm, a the package manager for JavaScript projects. npm is bundled with Node.js, so make sure you have it installed. If you don’t have, install Node.js.
Once you have Node.js, installing ESLint is just a matter of a single shell command. However, there are two ways to install ESLint: you can either install ESLint locally (i.e., for a single project), or you can install it globally on your computer/server. Or you can do both.
Local Installation
The local installation is the most common of the two possible types. For a specific project, you have a specific version (range) of ESLint defined—directly in your project files. Usually, this means you add ESLint as dependency to your project’s package.json file. Since linting code is usually something you do during development only, you define ESLint as development dependency by means of the -D flag:
$ npm i eslint -DGlobal Installation
The global installation type is useful if you want to use ESLint from time to time on various projects that don’t have ESLint as dependency defined. Or if you just want to lint one or two specific files. You can also even set up your IDE to use a global ESLint binary, and run it on whatever you have in your editor: complete project folders, some specific project files, or maybe even scratch files.
Installing ESLint globally is done by using the -g flag, like so:
$ npm i eslint -gUsing ESLint
Now that you have ESLint installed, the next step is to actually use it.
There are different ways to use ESLint, but they all have two things in common: configuration and execution.
The configuration of ESLint is necessary to define what rules you want to be included in your linting process, and how exactly these rules should be defined. The standard way of doing this is having a .eslintrc config file.
Executing ESLint is just a matter of executing the according (local or global) binary.
Using ESLint via CLI
Since it is a command-line tool, you can use ESLint directly from your console, with the following being the command definition:
$ eslint [options] [file|directory|pattern]*By executing $ eslint, you lint every JavaScript file that is found inside the current directory (and all subfolders), according to the found configuration. Oftentimes you only want to lint specific files or folders, though.
Let’s assume you are in the root of some project. If this project has dependencies then this means linting the current directory will also lint any JavaScript file found in the node_modules folder, which is something that you most likely do not want to do. By executing $ eslint resources tests, however, you only lint files found in the resources or tests folder, including subfolders.
Since ESLint is able to understand glob patterns, you can also do something like $ eslint "*.js". This will only lint JavaScript files in the current directory, not including subfolders. Depending on your operating system/console, the double quotes might not be necessary, but they also shouldn’t be a problem at all.
Using ESLint via Grunt
As a somewhat experienced developer, you know that automation is key. Therefore, the regular usage of ESLint is most probably not manually executing arbitrary shell commands. Instead, you want to integrate linting your JavaScript files into your build process. An easy way to do this is using a task runner, like Grunt.
In order to incorporate ESLint into your Grunt-powered build workflow, I recommend the grunt-eslint package.
First, install it via npm:
$ npm i grunt-eslint -DThen, configure and use the new eslint task in your Gruntfile.js file. Here is a minimal example:
grunt.loadNpmTasks( 'grunt-eslint' );

grunt.initConfig( {
    eslint: {
        gruntfile: {
            src: [ 'Gruntfile.js' ]
        },

        src: {
            src: [ 'resources/js' ]
        },

        tests: {
            src: [ 'tests/js' ]
        }
    }
} );

grunt.registerTask( 'default', [
    'eslint'
] );
For a more complete (and thus complex) example, you might want to have a look at MultilingualPress.
In case you are using another task runner, I’m pretty sure there is a similar package for this somewhere. For Gulp, for example, there is gulp-eslint.
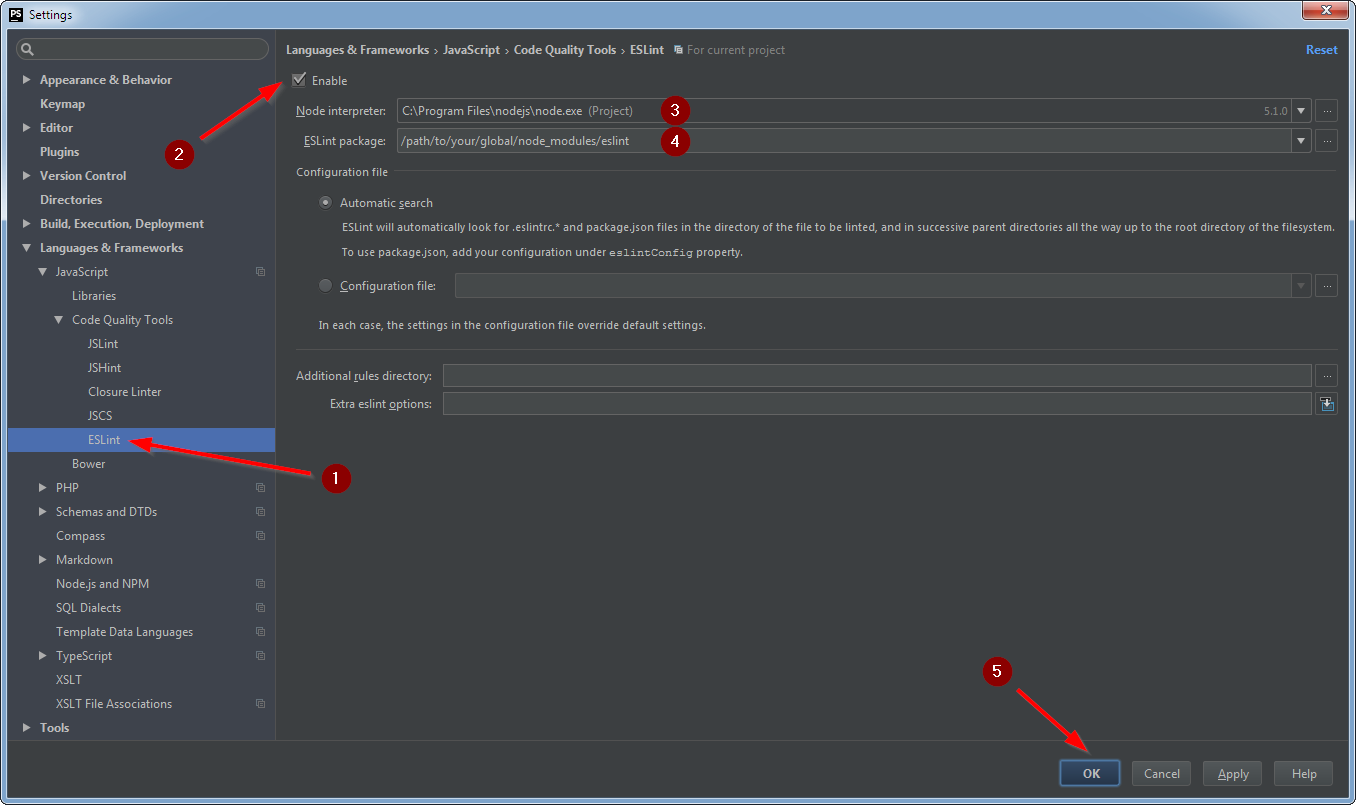
Using ESLint in PhpStorm
In PhpStorm, you can enable ESLint via the JavaScript Code Quality Tools:
Since I usually use ESLint as part of my build process, I don’t have it enabled in PhpStorm. But maybe you find this helpful.
Using ESLint for WordPress Projects
A lot of the rules regularly used in the JavaScript world in general also make sense for a WordPress project. What has been established as a best practice in general, should safely be assumed to be one for WordPress as well. And code that is said to include possible errors is the same for WordPress and any other web software.
When it comes to code formatting, though, things get (very) different.
The WordPress Coding Standards
Any new JavaScript code that should make it into WordPress Core has to follow the JavaScript Coding Standards. Even though these standards are based on the jQuery JavaScript Style Guide, WordPress-specific JavaScript code differs (a lot) from other JavaScript code that you might see in the Web.
Indenting code with tabs instead of two (or four) spaces and spacing things out almost everywhere already easily produces a result that is very different from code that follows the jQuery style guide. And this makes it rather hard to find something to start with when speaking about quality assurance.
A Shareable ESLint Config for WordPress
Working as a WordPress Engineer at Inpsyde—Germany’s biggest WordPress agency—I developed eslint-config-inpsyde, an ESLint config file specifically designed to follow current best practices and, at the same time, conform to the WordPress Coding Standards as best as possible. The according npm package exports actually two shareable ESLint configs that both have no dependencies other than ESLint itself.
Linting Modern JavaScript Code
In order to use the package for linting modern JavaScript code, all you need to do is to extend the default config. You do this by putting the following into your .eslintrc file:
{
    "extends": "inpsyde"
}
As of writing this, modern JavaScript code means the rules are specifically designed for ES6 code, while the config also allows to parse ES7.
Stuck With Legacy Code? Not a Problem!
In case you are not (yet) writing ES6 code, you can use the second ES5-compatible config file, by having a .eslintrc file like the following:
{
    "extends": "inpsyde/es5"
}
This results in a smaller rule set that does not include ES6-specific parts.
Customizing Rules
A great thing about ESLint configs is that you can build on top of an existing config. In fact, we already did this: by using extends in the above examples, we told ESLint to start with what the referenced config file includes, and then respect anything we define in our config file. We just didn’t provide anything to respect.
If you ever find an ESLint warning or error pop up too often in your WordPress projects, you might want to reconfigure the according rule to better suit your needs. A common example is when you use ESLint not only to lint your JavaScript sources, but also your tests. By default, the maximum number of statements per method is set to 12. If ESLint encounters a method that has more statements, you will be presented with an error. A unit test including one or more mocks, however, can easily have a lot more than 12 statements, and this is absolutely valid in this case. So this is something that we want to avoid, right?
Let’s assume you have your main ESLint config in your project root, and all your JavaScript tests are located in tests/js. In order to disable any output regarding the number of statements per method, you just have to reconfigure the according rule. But since you only want to change this behavior for linting tests, you don’t want to do this in your main config. What you do instead is place another .eslintrc file inside tests/js:
{
    "extends": "../../.eslintrc",
    "rules": {
        "max-statements": 0
    }
}
Just like before, we tell ESLint to use an existing config file—the one two levels up from where we are right now. But since we are not interested in the maximum number of statements, we go ahead and disable the according ESLint rule.
If you are using Grunt, you can also specify individual options (e.g., rules) for every target, for example like so:
grunt.loadNpmTasks( 'grunt-eslint' );

grunt.initConfig( {
    eslint: {
        src: {
            src: [ 'resources/js' ]
        },

        tests: {
            options: {
                rules: {
                    'max-statements': 0
                }
            },
            src: [ 'tests/js' ]
        }
    }
} );

grunt.registerTask( 'default', [
    'eslint'
] );
What About You?
Now that you made it through this post, you should have a starting point for using ESLint for your WordPress projects. But maybe you already did so before…?
Did you know ESLint already? Do you use it regularly? If so, how? Manually from your console, integrated into your IDE, or during your build process?
Did you also use ESLint for WordPress projects before? Did these follow the WordPress Coding Standards? If so, what ESLint rules or config file do you use? Did you even know the eslint-config-inpsyde package?
Is there something worth knowing that this post is missing?
Hey Thorsten,
Wow, I think you pretty much got rid of any excuses people might have of not using ESLint now… Great job with the article, very complete!
I had been using JSLint for my JavaScript linting so far (it was the first one I encountered at the time I built my gulp pipeline), but I will give ESLint a try.
Cheers,
Alain
Hi Alain,
thanks for the kind words. 🙂
I had been using a combination of JSHint and JSCS before, but when I started writing ES6 code, I quickly learned that I won’t get far with this anymore.
And since ESLint can do almost anything that JSHint (and also JSLint, for that matter) can do, and the team behind JSCS joined ESLint anyway, there really isn’t a reason for not using ESLint now (at least for me).
Thanks a lot for this, Thorsten! Keep it up! ESLint is a must these days. 🎯