Last week, Bego published a post about WordPress shortcodes. It is a pretty good write up, but there is one little thing I don’t quite like: the illustrated use case for an enclosing shortcode (i.e., one that wraps around other content). In this post, I will try to explain why that is, and what you should be using instead.
Shortcodes
The Shortcode API in WordPress is a fairly versatile and powerful means. In essence, it lets you execute a predefined PHP function anywhere in your post content, in order to (dynamically) generate even more content.
Configuration
By passing in (hard-coded) attribute values, you can provide input or better: configuration data for the function. And since it gets executed in the current request, you have access to almost anything you might need inside the function (thanks to WordPress being a global player 😉 ).
This means you can act upon one or more predefined values passed in as well as the current context, such as the post ID, or the visitor’s IP address. Of course, you can also execute any other PHP function, and thus behave (i.e., render) differently for logged in and not logged in users, respect whether or not the post has a specific category, or if this is a single post view or some archive.
Use Cases
There is an infinite set of diverse use cases for shortcodes. Say, you want to display some value (or piece of content) in a number of posts. And you don’t want to find and edit all of these posts in case that value ever changes. You could use a shortcode here that simply returns the value as it is right now. If it ever were to change, you’d only have to do this in one place: inside the shortcode callback.
You have a members-only area on your website? And you want to tease people so they sign up? Use a shortcode that checks if the user is logged in (or maybe even the user role), and show the full content for members, and an excerpt of what there is, followed by a sign-up form, for guests or non-members.
More than worth mentioning: shortcodes can be nested. So you can make an enclosing shortcode wrap around some content including another (possibly enclosing) shortcode. This extends what you can do with shortcodes even further.
What’s in my opinion not an ideal use case for a shortcode, though, is binding some sort of formatting or semantics to a specific piece of content. And this is exactly what Bego used as example for an enclosing shortcode: marking some content important.
TinyMCE Custom Formats
What do you do if you want a word in your content to be strong, or red, or a headline? You use the according button or input of your TinyMCE editor.
So, when you want to say “Hey, you word over there. You should be wrapped in a <kbd> HTML tag.”, or “You, last sentence. You should be marked ‘important’.”, you really shouldn’t be doing this by creating individual shortcodes for that. Instead, you should extend your editor with what is missing right now. Luckily, TinyMCE, the WYSIWYG editor in your WordPress back end, easily allows for this.
Enabling Custom Formats
In order to eventually make use of any custom formats, once added, you first have to enable the according UI element: a dropdown that is hidden by WordPress per default.
Enabling the dropdown can easily be done by hooking into the appropriate filter, mce_buttons_2, like so:
add_filter( 'mce_buttons_2', function ( array $buttons = [] ) {
return array_unique( array_merge( [ 'styleselect' ], $buttons ) );
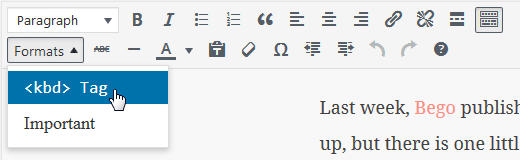
}, 20 );The above code simply inserts (or moves, if present) the dropdown as first element in your TinyMCE toolbar (i.e., the second button bar, which you first might have to make visible by using the according button). Your TinyMCE should be looking similar to this now:
Adding Custom Formats
Now that we prepared the editor UI, we can go ahead and add some custom formats. We do this by means of another filter hook: tiny_mce_before_init.
Let’s just add the according formats for the two examples from before: an inline <kbd> HTML tag, and an important block-level <div> HTML tag.
add_filter( 'tiny_mce_before_init', function ( array $settings = [] ) {

    $formats = [];
    if ( ! empty( $settings['style_formats'] ) && is_string( $settings['style_formats'] ) ) {
        $formats = json_decode( $settings['style_formats'] );
        if ( ! is_array( $formats ) ) {
            $formats = [];
        }
    }

    $formats[] = [
        'title'  => __( '<kbd> Tag', 'some-textdomain-here' ),
        'inline' => 'kbd',
    ];

    $formats[] = [
        'title'   => __( 'Important', 'some-textdomain-here' ),
        'block'   => 'div',
        'classes' => 'important',
    ];

    $settings['style_formats'] = json_encode( $formats );

    return $settings;
} );
The above code basically only adds the necessary configuration for our two new formats. Since we do not want to delete potentially existing formats, though, and since these are stored as a (JSON) string, we will have to do some checking and type casting first.
Displaying Custom Formats
One benefit of using custom formats is that they do not have one of the … shortcode shortcomings: missing display in the WordPress back end. When you look at a shortcode in your editor, you have no idea about what it will render on the front end. Custom formats, however, are a completely different beast.
Making custom formats visible in the back end is possible in two ways.
Inline CSS
Along with the format definition, you can also specify inline CSS for the according HTML tag. We do this now for the <kbd> format by changing its definition from before like so:
    $formats[] = [
        'title'  => __( '<kbd> Tag', 'some-textdomain-here' ),
        'inline' => 'kbd',
        'styles' => [
            'padding'          => '2px 4px',
            'background-color' => '#333',
            'color'            => '#eee',
            'white-space'      => 'nowrap',
        ],
    ];
Having this inline style definition in place, we can now directly see in the Visual editor in our WordPress back end how the custom format will be rendered:
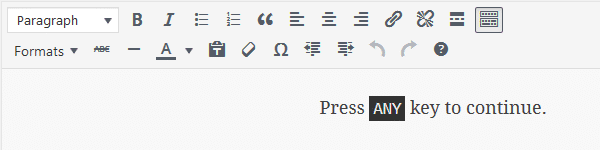
When we have a look at the according markup, we see the following:
Press <kbd style="padding: 2px 4px; background-color: #333333; color: #eeeeee; white-space: nowrap;">ANY</kbd> key to continue.This means that the HTML tag has been created with a style attribute containing all CSS rules according to what we specified in the form of key—value pairs in the format style definition (with colors given in 6-digit hex notation).
Editor CSS
The second, and both more widely used and the suggested, possibility to style custom formats is using a real CSS file (e.g., in your theme). We now want to style our important pieces of content according to the following CSS:
div.important {
  margin: 1em 0;
  border: .5em solid #000;
  padding: 1em .5em;
  background-color: #eee;
  color: #333;
  font-weight: 400;
}
In case the above CSS code is included in our theme styles, anything that has been marked important will render as desired; but only on the front end. To make the styling available to the back end as well, we have to enqueue a separate CSS file by using the add_editor_style() function.
We therefore create a new file, editor-style.css, in the root of our theme, and put the above CSS code inside. Then, we enqueue the file like so:
add_action( 'admin_init', function () {

    add_editor_style();
} );
The above code can go in our theme’s functions.php file, for example.
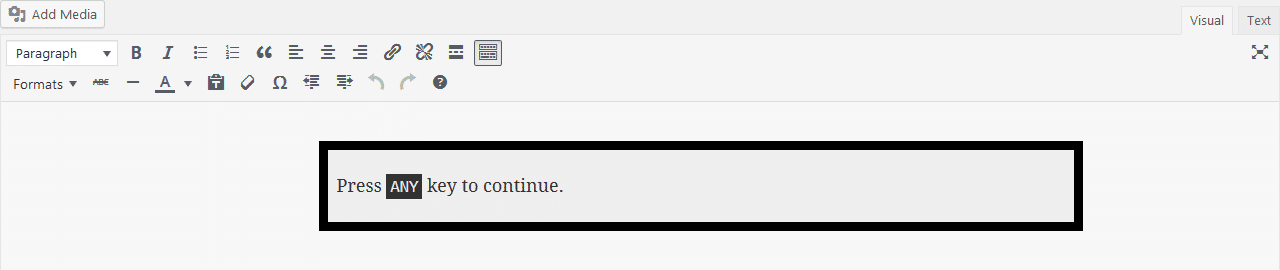
We then mark the sentence from before to be important, and save the post. Having refreshed our Edit Post page, we should see something like this:
Advanced Usage
TinyMCE offers way more than the two simple use cases from before. You can, for example, nest formats (e.g., have a non-clickable Highlight element that has various clickable highlight formats as children). This could, for example, look like so:
    $formats[] = [
        'title' => __( 'Highlight', 'some-textdomain-here' ),
        'items' => [
            [
                'title'   => __( 'Highlight Primary', 'some-textdomain-here' ),
                'inline'  => 'span',
                'classes' => 'highlight highlight-primary',
            ],
            [
                'title'   => __( 'Highlight Secondary', 'some-textdomain-here' ),
                'inline'  => 'span',
                'classes' => 'highlight highlight-secondary',
            ],
            // ...
        ],
    ];
Furthermore, you can not only use an HTML tag to be the inline or block target, but an arbitrary selector instead:
    $formats[] = [
        'title'    => __( 'Call to Action', 'some-textdomain-here' ),
        'selector' => 'a.button',
        'classes'  => 'call-to-action',
    ];
The above format, for example, can only be applied to an anchor element with the button class (which could have been added by yet another format before, of course).
Convinced?
So, did you get my point? Is there one? 😀
Do you see it the same way?
Or did I miss something here, or simply didn’t get right?
Please, let me know!
As Albert Einstein said, “everything should be made as simple as possible, but not simpler.”
My example of using enclosing shortcodes to… well, format some text, certainly wasn’t optimal. While I wanted to keep my lengthy post as short as possible, I could have chosen a better example.
Of course your solution to add functionality to the TinyMCE editor is by far more elegant.
Thank you for showing a better way to handle the formatting.
Hey Bego,
thanks for answering here as well! 🙂
No harm done. I absolutely know how hard it can be to come up with a really fitting and at the same time not oversimplified as well as too hard to grasp example. When working on posts or slides, this really takes a huge amount of time sometimes.
Thanks, but this is, of course, only true for such things that I mentioned in this post. There are numerous use cases for shortcodes, and only shortcodes!
This post should not only correct your example, but even more make people aware of TinyMCE Custom Formats. 🙂
Thanks for this post! I used your example to add some markup options to my TinyMCE that I’ve been doing manually for so long — for example, marking up
citetags, or adding attributes to blockquotes, etc. — and now instead of clicking “View source/plain text” I can quickly add it in the Visual pane.Much appreciated!