Welcome to my recap of Day 6 of the free JavaScript 30 online video course by Wes Bos. In case you really have not yet heard of the course, quickly head over to it and get started right away! 🙂
Please refer to the JavaScript 30 archive for all recap posts.
Objective
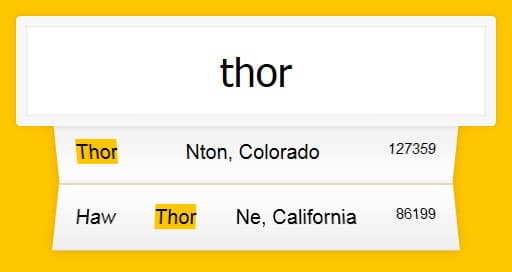
On Day 6, the task is to implement typeahead functionality for a given (search) input, working with a remote dataset.
The provided starter files include an HTML file that contains the UI, and a CSS file that takes care of all the styling. What is missing now is to make the search work with an external data source, and have the results display nicely below the input element.
I stopped the video right after the objective has been made clear, and started implementing it on my own.
Conception
Thinking through the typeahead input, we have, as we often do, two phases: a preparation phase performed only once, and a repeatable phase for reacting to the user input.
This is what I noted to be done:
- fetch data from external source;
- cache the DOM element used for displaying the suggestions;
- cache default content of results container for later display (when input is empty);
- when the user inputs data:
- display all the datasets that match with either city or state, or both;
- a single result should contain city and state, and the population;
- all occurrences of the search string inside city and/or state shall be highlighted;
- if the input is empty, display the cached default content.
Implementation
The above conception includes several things, and yet it is fairly straightforward. So let’s serve one phase at a time.
The following code realizes the preparation phase:
const endpoint = 'https://gist.githubusercontent.com/Miser...25e2c6f6/cities.json';

const cities = [];

fetch( endpoint )
    .then( ( response ) => response.json() )
    .then( ( data ) => cities.push( ...data ) );

const suggestions = document.querySelector( 'ul.suggestions' );

const defaultItems = suggestions.innerHTML;

document.querySelector( 'input.search' ).addEventListener( 'input', handleInput );
Since the code follows exactly the conception, there’s no need to explain anything, I hope. Unless you haven’t used fetch() before, of course. I did, but only while doing Wes’s (awesome!) ES6 for Everyone course, so I double-checked with the documentation. 🙂
Second phase, reacting to user input:
function handleInput() {
    const input = this.value;

    if ( input ) {
        suggestions.innerHTML = cities
            .filter( ( city ) => matchesCity( city, input ) )
            .map( ( city ) => itemizeCity( city, input ) )
            .join( '' );

        return;
    }

    suggestions.innerHTML = defaultItems;
}
The above function takes care of displaying the matching cities—which also means emptying the list if there are none—and displaying the default content cached during the preparation phase.
So let’s have a look the filter callback then.
function matchesCity( { city, state }, input ) {
    const regExp = new RegExp( input, 'i' );

    return regExp.test( city ) || regExp.test( state );
}
Nothing special here. A city matches if either its name or the name of the state includes the user input.
What’s left is rendering each individual city as list item, and highlighting the user input in both city and state. I did this like so:
function itemizeCity( { city, state, population }, input ) {
    return (
        `<li>
            <span>${highlight( city, input )}, ${highlight( state, input )}</span>
            <span class="population">${population}</span>
        </li>`
    );
}

function highlight( text, input ) {
    return text.replace( new RegExp( input, 'gi' ), ( match ) => `<span class="hl">${match}</span>` );
}
With the above, I had some trouble, though.
Firstly, I had the content of the list items initially defined like so:
function itemizeCity( { city, state, population }, input ) {
    return (
        `<li>
            ${highlight( city, input )}, ${highlight( state, input )}
            <span class="population">${population}</span>
        </li>`
    );
}
Problem was that there was lots of space before and after the highlighted characters.
Eventually I found out this was due to the list items having the following CSS rule:
justify-content: space-between;I fixed this by simply wrapping the city and state names in a separate <span> element, as you already know.
The second problem was more a personal issue. The matching of city and state name against the user input should be case-insensitive. No problem here. I want each highlighted (i.e., replaced) occurrence, however, keep the exact same way it originally was. This means I cannot just go ahead and replace all matches with the user input.
True, Wes defined the list items to auto-capitalize. But still, I wanted to have this right. So I tried a few things with back references, but failed. 🙁 The (only) way I could achieve this was, as you can see above, by using a separate callback to perform the replacing. 🙂
Refinement
Finishing the video, I made a few observations.
I used the input event (instead of both change and keyup). That simply made the most sense to me.
While Wes used regExp.match(), I decided to do regExp.test(). Reasons are it is faster, and I don’t care about the matches anyway. I only want to know if there are any.
I still like to destructure objects, passed to a function, in case I only need very few properties. 🙂
And finally, seems like I overlooked a detail: the population of each city is not just a number; it is formatted to have a comma as thousands separator.
I realized this by using Intl.NumberFormat; no need for a custom function (anymore). 🙂
const formatter = new Intl.NumberFormat( 'en-US' );

function itemizeCity( { city, state, population }, input ) {
    return (
        `<li>
            <span>${highlight( city, input )}, ${highlight( state, input )}</span>
            <span class="population">${formatter.format( population )}</span>
        </li>`
    );
}
Live Demo
Want to see this in action? Well, here is a live demo. 🙂
Retrospection
To be honest, this task needed way more time than I expected.
There were quite a few concepts involved: fetch(), array functions, regular expressions, CSS (issues 😉 ), …
But it was fun, and I’m more than happy with my result!
And You?
JavaScript 30 is free! So, unless you already did this on your own, what’s your reason not to? 🙂
Leave a Reply